
Business agility enables organisations to innovate and deliver goods. Learn the framework for business agility and tips on improving it in your organisation.

Growing your staff complement is a positive sign of growth and should be embraced, however, it should be done with caution. Wrong appointments will have harmful aftershocks - not only in terms of time and cost of people performance management but in reputational damage to your brand.
In today’s technology industry, companies are looking for the best talent to join their existing team and at the same time, the potential candidates are looking to join the best company. Appointing new staff is a two-way stream which must be navigated cautiously. Below are a few tips to consider to ensure a positive outcome:
1. Look beyond the CV
So you’ve found the CV that really stands out and speaks to your needs. Qualifications and skills are important, but remember that they can be taught. Unfortunately, good character cannot.
Be selective and allow soft skills to be a strong weight, as they are key to establish a professional workforce and a pleasant work environment. Effective communication skills, being a team player and having a good work ethic are some of those soft skills that need to be measured during the interview process. Ask the candidate open-ended behavioural questions to get them to talk freely. This will allow you to evaluate their soft skills.
Your company has values which all staff should live and work by. Keep them in mind when you screen and interview new candidates. If “taking ownership” is a value, then ask a related question to assess if your candidate is willing to take ownership for tasks and even failures. Appointing someone who doesn’t live by “integrity”, if it's your company value, will be fatal.
ALWAYS, do a thorough background screening and reference check. It's a good idea to mirror your interview questions to a fellow staff interviewer to get a second opinion on the same questions.
2. Have an attractive Employee Value Proposition
Skilled professionals are in high demand providing your candidate with options from other employers. It could be reasonable to assume that remuneration is fairly aligned for the same occupations in the same industry. Therefore focus on the other aspects of employee satisfaction. Make sure that your employee value proposition beats your competitors.
Recent employee surveys (do you have a survey we can reference?) have indicated that when it comes to staff retention, monthly salary is not top of mind. People want to be part of a company that is willing to invest in them and assist in their career growth. A proper onboarding process and an effective support/ mentorship programme is non-negotiable.
People don't tend to make a lateral move in the market if you offer them their next big challenge and something to look forward to in the near future. Establish and encourage a thought leadership culture in your company allowing staff to give their views on aspects topical to your line of business.
3. Get your team involved in the process
Use your existing staff to attract new talent by introducing them to the new candidates. This interaction will give the candidate exposure to the culture, energy and experience (successes and failures!) of the existing team. Since the new candidate will form part of a team, it will be valuable for both parties. It will also empower your team and include them in the hiring process. Ideally, the exposure should convince the new candidate to join and become an asset to your company.
Finally, recruitment should not become basic or “old news” but should rather enjoy renewed attention. With so many options for candidates today, it's time to clean out the cobwebs and focus on attracting the right people for your business.
If you have ideas or suggestions on this topic, I would love to hear from you. Feel free to get in touch via LinkedIn.

A common misconception I’ve heard quite often is that gamification and game design are the same things.


In this tutorial we will learn how to authenticate using google sign-in. Google enables us to register/sign-in to our apps using different social accounts such Facebook, Twitter or in our case Google. Let’s get started!
Android studio project
Create a new Android studio project and name it “FirebaseAuthGoogle”. For the Company domain use “myricseptember.com” and ensure that the Include Kotlin support checkbox is selected.

Leave the minimum SDK as it is and click Next. Select “Empty Activity”, than click Next. Name the activity “SignInActivity” than click Finish.
Create a firebase project
The first step is to create a Firebase project within your Firebase Console. Click on Add project:

Name your project “FirebaseAuthGoogle”. Once you’ve given your project a name, read and accepted any terms and conditions, then click the ‘Create project’ button. Once done you should see the following screen indicating that the project was successfully created.

Click the continue button where you will be taken to the welcome screen. On this screen you are given the option to create either an iOS, Android or web app. We are creating an Android app so click on that option:

Another window will open requesting some information relating to your application. Fill in the package name “com.myricseptember.firebaseauthgoogle” than add your SHA 1 key. If you don’t know how to get your SHA key follow these steps:
- With Android Studio open, click on the Gradle menu on the right to open it.
- Open the folder structure as follows: FirebaseAuthGoogle -> :app ->Tasks->android -> then double click on ‘signingReport’

Note: if the packages are not showing in the gradle menu just click the refresh button:
A window will open at the bottom from which you can get your SHA1 key:

Note: Remember to select the app option in your Android Studio project once you have your SHA key, see below:

Add the SHA key and click On Register app:

Download the JSON file and place it within your android app as indicated by the arrows then click ‘Next’:

Once you get to the screen below just click next since we will be adding all the necessary gradle dependencies at a later stage. Also after the Add Firebase SDK screen Firebase will try to check if the app has made contact, just click on ‘skip this step’:

Great! Your application is now connected to firebase, but we still have some more work to do. Let’s get to it!
Enable Google Sign-In on Firebase
In your Firebase console on the left click on the ‘Authentication’ item. From the tabs select ‘Sign-In method’ to open the window below. Select the following:

Enable Google Sign-In in the top right corner. Also provide a ‘Project support email’ and click Save.
Add Gradle dependencies
Next, go to your Android Studio project. To enable social authentication we need to add some Firebase dependencies manually. It is import to use the latest Google Login SDK version which you can find here.
Here you’ll find the latest Firebase dependencies.
Open the project level Build.gradle :
Then add the following dependency:

Next open the Module:app level gradle dependency:

And add the following dependencies:

Once all these dependencies have been added, Android studio will require you to sync the project. This will download all the dependencies from the internet and will require you to have an internet connection.
Note: It is very important to ensure that you have “Google Play Services’ installed. You can do so by clicking on ‘Tools’ than selecting ‘SDK Manager’ as seen below:

After clicking on ‘SDK Manager’ the below window should open. Select the ‘Google Play Services’ checkbox and click apply. This will ensure that Sign-In works as expected on the Google Emulator as well.

Create a simple UI
Next we will create a simple UI with a single button in the middle of the screen. You can make your UI pretty but for demo purposes we are going to keep things simple.

Add the following to your “activity_sign_in.xml” xml file:

Since you need to connect to the network to authenticate with Firebase you will need to add the internet permission to your AndroidMenifest.xml:

Integrating Google SignIn
Within the SignInActivity add the following variables for the GoogleSignInClient and GoogleSignInOptions.

Next add the following method to your code. The method is used to request the user data required by your app such as the users’ ID and basic profile information, email address and Id token. Call this method in your OnCreate() method.

Add the setupUI() method to set up the OnClickListener for our login button. This method gets called in the OnCreate() method:

Next, we add a singIn() method which will be called when the user presses on the log in button. The user will be prompted to select an authentication account. The signInIntent is used to handle the sign in process and for starting the intent the startActivityForResult() is used.

Once done the onActivityResult() is called in which the selected google account is retrieved and sent to Firebase for authentication.

Note: the implementation for the firebaseAuthWithGoogle() method will be discussed below.
The authentication with Google step is now completed. Next we need to authenticate with Firebase. Declare an instance of the FirebaseAuth object.

Then in the onCreate method, get the shared instance of the FirebaseAuth object

After a user successfully signs in, gets an ID token from the GoogleSignInAccount object, exchange it for a Firebase credential, and authenticate with Firebase using the Firebase credential:

Note: The HomeActivity will be created soon
To avoid the need for the user to sign in every time the app is launched it would be better to check if the user is signed in already. This can be achieved by checking if the current user is already signed in from within the onStart() method:

Create a companion object to open the SignInActivity via intent.

Great! Everything for authentication is set up. Next we just need to create a second screen (HomeActivity) to which we will navigate once the user is successfully authenticated. You can use this screen to retrieve and display the current user’s information from the Firebase database, but that is out of the scope of this tutorial. We will simply display some text congratulating the user for successfully signing in and have a log out button at the bottom.
Home Screen
Create an Activity called HomeActivity. The activity will look like the screen below once done:

The XML for activity_home.xml should look something like the below:

Within HomeActivity add the setupUI() method which will be used to set up the click listener for the sign out button. Call the setupUI() method within your onCreate() method.

Next create the signOut() method which will be used to sign the user out of the application.

Finally create a companion object to to open the HomeActivity via intent.

We’re Done! Let’s run the application and celebrate our hard work.
Conclusion
In this article we have built a simple application that makes use of Google authentication. Firebase is great and there is much more you can do with it. I will be posting more Kotlin articles and will be using more of Firebase. I look forward to your feedback and would advise you to take a look at the repo.
Thank you for reading this article and follow me on Twitter and on Medium for future articles.
Article also published on Medium.com.


In this article, I'll discuss how design teams can adopt Agile and use the Scrum framework to achieve delivery in terms of customer experience journeys, prototypes (low and high fidelity) and services blueprints.
The background
When I first joined the design office nine months ago I didn't have a clue how I was going to be a Scrum Master to a design team. I was unsure of end delivery from a full design perspective. From past experience, I was used to working with technical teams (developers, testers, BA’s architects and one or two designers).
The first few weeks were spent trying to understanding what the teams deliver and handover and this left me somewhat confused. I then remembered no matter what needs to be delivered, if the Agile principles are followed anything is achievable with the right team and skills.
Let's look at how the Agile principles were followed within the design team:
Principle 1
Our highest priority is to satisfy the customer through the early and continuous delivery of valuable software.
From a design perspective, testing is always an important task that needs to be fulfilled as the customer's experience is extremely important, which requires improvement regularly.
Principle 2
Welcome changes in requirements even late in development.
Agile processes harness change for the customer’s competitive advantage.
When business requires a certain feature to be improved, the team then works towards a solution. Pitfalls are noted immediately and the direction is changed.
Principle 3
Deliver working software frequently, from a couple of weeks to a couple of months, preferably on a shorter timescale.
The team always aims to deliver a shippable product or feature after each sprint which can have an immediate impact on the customer's experience. As an example, suggesting the removal of steps in the customer journey which can improve turnaround times.
Principle 4
Business people and developers must work together throughout the project.
As a Scrum Master for design teams, we realised that most people within the organisation don’t understand what designers do. We then started to include the relevant stakeholders and decision makers during the problem and solution discovery. The benefit - everyone is kept in the loop until the final product or feature is handed over. Additionally, it eliminates the pressure from stakeholders pushing for timelines as they are then aware of the process.
Principle 5
Build projects around motivated individuals. Give them the environment and support that they need and trust them to get the job done.
This also relates to Principle 4. Once individuals are enabled and trusted to deliver, they will do their best. In our case, the design team gained trust among each other and with their stakeholders.
Principle 6
Efficient and effective method of conveying information is face to face conversation.
The team was co-located however two of the designers were based in Cape Town which had no negative effect on delivery. The team used a tool called Zoom for all ceremonies, ideation sessions and check-ins which allowed for face-to-face interaction.
Principle 7
Working software is the primary measure of progress.
Teams should always strive for the primary objective - improved customer experience.
Principle 8
Agile processes promote sustainable development. The sponsors, developers and users should be able to maintain a constant pace.
Working together effectively and maintaining consistency with business stakeholders and decision makers was key to our success. Aim to deliver consistently for customers across different channels and platforms to improve the experience.
Principle 9
Continuous attention to technical excellence and good design enhances agility.
Our team learned to design with reusability in mind, questioning fit for purpose. If the experience designed does not fit the criteria then the approach is adjusted to be fit for purpose.
Principle 10
Simplicity and the art of maximising the amount of work not done is essential.
For this team it was simple: ‘Is it fit for purpose?’
Principle 11
The best architecture requirements and design emerge from self-organising teams.
Our team became accountable and responsible to each other. Our biggest fear was to disappoint each other in terms of failing to deliver. This meant that we were cross-functional and assisted each other from time to time.
Principle 12
At regular intervals, the team reflects on how to become effective, then tunes and adjusts its behaviour accordingly.
Our team had different skill sets such as UX, UI and service design. The youngest team member was 23 and the oldest is 51 and the level of respect and value this team had for each other was incredible. They were open to learn from each other and to handle criticism well. They didn't get attached to ideas and learned from past failures.
Lessons learnt
Agile can be implemented and followed in design successfully. Just remember to stick to the principles and it will more than likely come naturally to you.

Account Manager – it’s a common title in our industry, and yet so often means very different things to different organisations.
Some account managers mainly focus on sales, others consider themselves project managers first and foremost. Some double as IT advisors, while others spend all their time nurturing customer relationships and keeping customers happy.
At DVT, an account manager is all of these things. But more importantly, the skills it takes to become a successful account manager have less to do with technical proficiency and more to do with the ‘softer’ skills that are critical to every single aspect of the role.
In our fast-paced, highly competitive industry, the human side of the business too often plays second fiddle to the technical. But as we seek to help our clients digitally transform their businesses to better compete and succeed, the process is as much about the human side of change and growth as it is about crunching numbers and coding software.
The following steps are used to guide the development of any successful account manager in our business, and could likewise be valuable to yours.
1. Working to a set of values
Every business, DVT included, has its own set of cultural values, honed over time and passed down to successive employees through recruitment and training programs. These values cover a range of different aspects, describing how we conduct ourselves personally and professionally. For example, ‘doing the right thing’, ‘making an impact’, keeping it simple’, and ‘work-life balance’ are all shared values common to the company culture and its employees. If you haven’t defined your values as a company, you can’t expect your account managers to follow them.
2. Emotional intelligence (EQ)
Perhaps the most important part of an account manager’s job is managing people. In fact, if you substitute the word ‘account’ for ‘people’, you’d get a good idea of how many account managers spend most of their days. Managing people requires a very different set of skills to managing numbers or IT systems, and yet too many account managers are only trained for the latter. Knowing when to push back, or when to give more; being able to read someone’s expression and reaction, their body language and the tone in their voice; and having the ability to think before speaking – these are just some of the critical skills that make up an account manager’s EQ.
3. Understanding culture and unique conversation style
No business relationship is ever the same. The way we speak with one person will always differ, even if only slightly, to the way we speak with another. This doesn’t necessarily come down to our level of seniority or skill, but rather to intuitively knowing (or learning) the best way to connect with a person based on their personality style, the history you have with them, or the way they treat you at face value. Taking the time to learn and understand how to speak to different people is a stepping stone to building lasting relationships with them.
4. Getting personal with consultants
We’re all pushed for time, and therefore making time to get to know our consultants is often last thing on our daily To-Do list. However just a little effort made to spend time with each individual on a regular basis to get to know them, and for them to get to know you, builds a rapport that encourages trust, openness and honesty. These qualities in a working relationship help keep consultants engaged and retain staff.
5. Understanding talent acquisition and retention
DVT recruiters make excellent account managers, not only because of the recruitment cycle they go through to on-board new consultants, but also because of the interview and assessment processes our consultants go through with our clients. Recruitment in the IT industry can be highly competitive given the skills shortage in South Africa, which is why it’s important to learn to connect to consultants on a personal level, and to constantly stay informed about their relationships with clients. That way, any ‘issues’ are identified and resolved before they escalate, and the cycle of trust is constantly restored.
6. Project management
This may not appear to be a ‘soft’ skill like some I’ve already covered. However, an account manager is, at some level, also necessarily a project manager. DVT account managers work very closely with each practise and competency team, along with several other teams: development, business enablement, data/analytics, testing and automation, and so on. To work effectively and equally with each team means the account manager must always be proactive, communicative, transparent and organised. Involving multiple teams on a national basis while managing an important assignment requires a high level ‘people’ project management skill.
7. Knowing when to say ‘No’
It can be daunting to say ‘No’ to a client (or a colleague or a boss for that matter) but it’s a skill that needs to be learned and used effectively for successful account management. It’s even harder to say no to new business, especially if you are measured and rewarded for the business you bring to the company. But if taking on new requirements from existing clients – or business from new clients – that is unrealistic, or compromises values, or negatively affects delivery standards on other projects, ‘No’ is sometimes the only safeguard. Using measurement metrics helps to identify which opportunities are worth focusing on, but the ‘art’ of knowing when and how to say ‘No’ is often just as important as the science.
8. Thirst for knowledge and personal development
There is an overwhelming amount of information available to us as account managers, and it’s constantly changing. It’s not good enough just to know what our company does; we should also want to know the trends and topics of industry. This improves our confidence and encourages like-minded conversations among peers and clients. As account managers we need to set aside time every day to upskill, learn and improve – so it helps if we have a natural learning instinct, or learn to develop one.
9. An Agile mindset
Agile is a word synonymous with DVT on a business level, but it’s also a critical component of the very human skills we instil in our account managers. As account managers we understand better than most how direction, goals and purpose constantly change, both internally and for our clients. This means that we don’t always have a clear view of what’s coming, regardless of how much planning we do. We therefore need to learn how to be adaptable and flexible every day, to be open to new, as-yet untried and unproven approaches, but most of all, we need to accept that there will always be a mix of achievements and missed opportunities in our line of work. If managed properly, the ups and downs make us highly resilient, humble and motivated to ensure continuous improvement in our way of work.
When you just want to design UX/UI, code and then sleep…
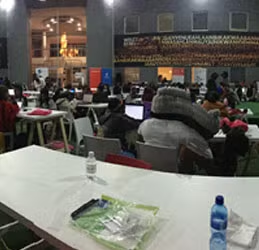
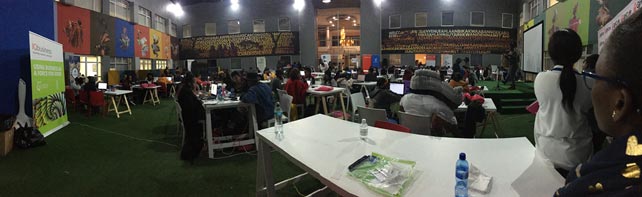
That is what you can expect at a #Girlcode Hackathon (and some food and energy drinks every now and again).
This year’s Girlcode Hackathon (#GirlCodeHack) took place at 22 on Sloane, Bryanston, Johannesburg and it was an absolute blast.
From apps that give you more insight on tertiary education, to apps that educate you on recycling in your city, to water saving games - all designed, developed and finished in 24 hours. Who said ladies can’t code and UX like a boss?
The 17 United Nations Sustainable Development Goals (Image below) of which we had to choose one or more, are the problems we had to solve.

Looking at these goals, you do tend to get carried away with ideas. When my team and I sat down to discuss a goal we could solve, Paballo Moloi (Pabi) mentioned the waste issue we are currently facing in Johannesburg, which led us to ‘recycling in your city’.
Recycling does not only cover Goal 11, Sustainable cities and communities but also; 6 - clean water and sanitation, 7 - affordable and clean energy, 13 - climate action, 14 - life below water and also 15 - life on land.
Our solution, recycling, led us to create an app, Greenly, that allows you to become more educated around materials that can be recycled and which cannot. You also get all the collection and drop-off points in your city where you can recycle, but not only do you just recycle, you also get rewarded for your recycling contributions. Throughout recycling, whether it is through a collection service or whether you drop off, you will receive a QR code for each time you recycle, the QR code will give you points and as they accumulate you receive vouchers from certain retail partners in South Africa, whether it is a R100 petrol voucher, to R50 off your next grocery purchase.


I started the UX and UI of the app that was later developed by Pabi and Siphokazi Fikeni. Due to the time constraints we only chose to do an Android App and website.
Saturday morning as Pabi and Siphokazi started the Android development, I started building our website. The website gave more information regarding Greenly and also included links to the App stores for down-load. In between the day we had to give elevator presentations to say what we are up to, our progress and goals.

We then also had occasional breaks in between as well as breakfast, lunch, dinner and midnight snacks. The most challenging part was getting through the night, as we were in a venue with a semi-open roof, but myself, Siphokazi and Pabi made a plan and moved to the cafeteria and continued our coding and UX-ing till the early hours of the morning.
With a few power naps in between, we had time until 10:00 on Sunday morning to finish the whole project and get ready for the judging stages.
We had five minutes to present to one of the four judging panels, thereafter the four panels of judges got together and selected their top nine.
We are proud to say that Greenly made it to the top nine! (YEY! ?)
The top nine then had to present again, but this time to everyone and a panel of three judges. After all the teams presented, the judges made their decision for their Top 3 and the winners were announced.
So after 24 hours of coding, UX and UI design and some HTML and CSS we are proud to have ended up on the top nine. (And yes, we went home and slept and slept)
Thank you Pabi and Siphokazi, it was a weekend to remember - You are the best

The AI, Data and Analytics technology space is certainly in the spotlight. A great deal of coverage is being given to the potential application of these capabilities and almost the necessity to do so in order for businesses to survive in the competitive, digital landscape. That pressure though to adopt, use and disrupt comes with dangers that are certainly not receiving the same air time.

Godot Engine V3 (Open Source)
Have you ever wondered how difficult it would be to create a game in 2018? Truth is, it takes some time and effort but it’s not really difficult. There are many popular game engines available today for you to choose from. To name a few – Unity, Unreal Engine, Godot, Construct, Game Maker, Amazon Lumberyard, ARKit etc.
If there are so many to choose from why use Godot?
Well, Godot is an open source MIT licensed multi-platform 2D and 3D game engine that provides common tools so you can focus on making your game. To put this in simple terms, Godot is free to use, which means you don’t have to pay any money to use it, and after you have created the game and hosted the game there are no royalty fees involved as with other game engines. Godot Engine also supports cross-platform compatibility and makes it easy to export the game to multiple devices. The official Godot website can be found here: https://godotengine.org.
You can download Godot for your platform of choice here: https://godotengine.org/download. Godot is also available for download on steam and can then be found and launched under your software section.
To name a few of Godot’s features:
- Godot comes with hundreds of built-in nodes that make game design an easy task.
- Create node configurations with support for instancing and inheritance.
- Visual editor with all the tools needed packed into a beautiful and uncluttered context-sensitive UI.
- Friendly content construction pipeline for artists, level designers and animators.
- Persistent live editing where variations are not lost after stopping the game.
- Create your own custom tools with ease using the tool system.

What does Godot use to create these games?
You have a few options to choose from in terms of programming language. There is GDScript which is a high level, dynamically typed programming language used to create content. It uses a syntax similar to Python. Its goal is to be enhanced for and tightly integrated with Godot Engine, allowing great flexibility for content creation and integration. You can read more on GDScript here http://docs.godotengine.org/en/3.0/getting_started/scripting/gdscript/gdscript_basics.html.
There are also other options such as full C# 7.0 support using Mono, full C++ support without needing to recompile the engine. There are also additional languages with community-provided support for Python, Nim, D and other languages.
Some other supporting development features that Godot offer:
- Visual scripting using blocks and connections.
- Built-in editor with syntax highlighting, real-time parser and code completion.
- Integrated documentation. You can browse and search the whole API offline, without leaving the editor.
In this article, I will explain a few concepts of the Godot game engine and show a few of its features. I will also show some GDScript coding examples and explain what’s going on in the script. I will provide you with a sample game that you can use as a reference for creating your own game or you can add to the existing game for practice. I won’t be able to explain every single line of code in this article but the game files are available to you and should serve as a good reference and starting point.
Getting started with game creation
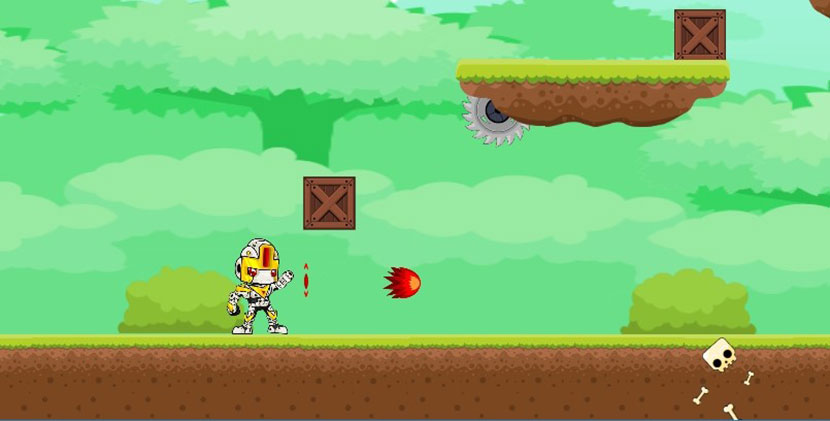
So now we begin with the fun stuff. Where to start when creating a 2D game? There are a number of places from which you can start. Some prefer to first create the level with all the objects in it and thereafter create the characters and in-game items such as power-ups and so on, but I prefer to start with the character and its movements and adding to the game from there.
When starting your game ensure that all contents you use are free and don’t violate any rules or laws in the way you use them. If you choose to download the character sprite sheets or background image for your game, make sure it is not copy protected or you will get into trouble if you plan on selling the game.
Now we will start with our game-specific concepts. First off you can download my sample game here: https://github.com/DewaldOosthuizen/retro_mashup.git. You can follow along with this article and use the game files as a reference to create your own game, or you can request access to this repository and add new levels and things on to this game. This game cannot be sold as the content I have used are not my own and selling them will break the licence agreement of using them. Therefore, this game will always be freely available for whoever has the link to the repository.
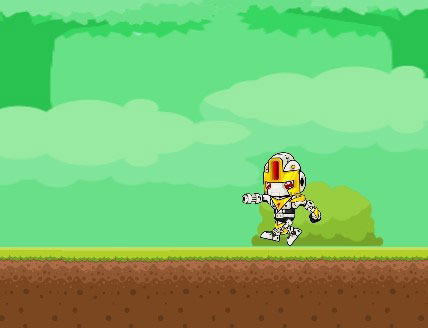
It this article, I will explain some of the concepts of Godot using my character scene. Before we start with our character, Godot gives you access to 3 body types for game development. First of is the KinematicBody2D type. We usually use this type of creating a game object that can move around in some sort of way. The character we will be controlling in the game will be using this body type. The next type is the RigidBody2D type. This is used to simulate objects which are affected by physics that the game engine handles for you, such as gravity. Godot automatically assigns a gravity strength to the object and you can configure the strength of the gravity. These body types should only be used when needed as they are the most resource intensive of the body types. The last body type is the StaticBody2D type. This body type is used for objects that should not be able to move. These objects are stationary. The floating blocks in Mario are stationary objects and so are the staircases, they would be built from StaticBody2D body types.
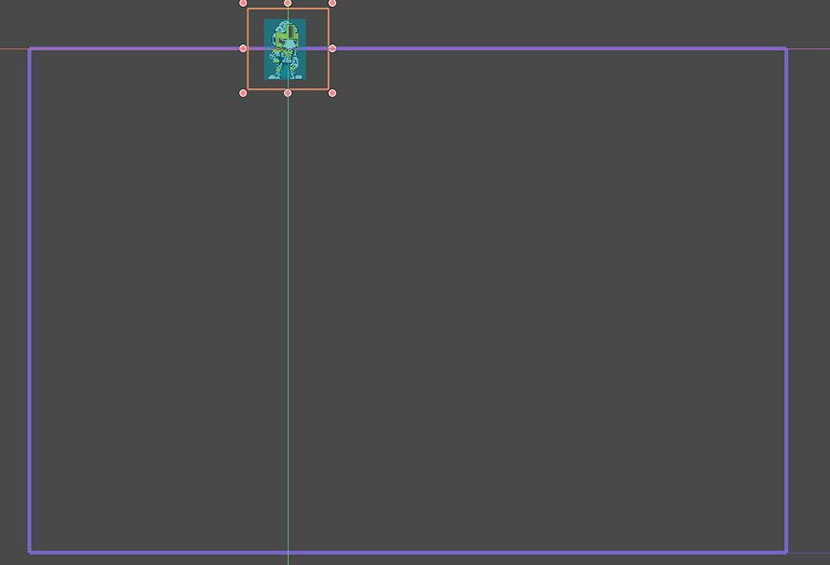
The image above shows your character scene.
The character scene exists out of all the components and nodes you are seeing on the image. The KinematicBody2d being the parent node and existing of a few child nodes.
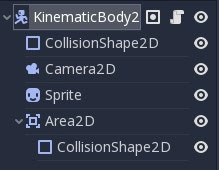
CollisionShape2D
The CollisionShape2D is used to draw a shape around your character which you would like to identify as the shape that can collide with other objects. If you want your character to stop when walking into other objects, this would be the CollisionShape2D’s job. If the other object also has a CollisionShape2D object, the two objects will collide and they will stop. They won’t be able to pass through one another.
Camera2D
The Camera2D (which is the dark purple line you are seeing around the character) is used to make the screen follow your character as you move forward and backwards in your level. If you move out of your game screen size (which you can configure under editor settings) your character will keep moving but you won’t be able to see your character. The camera object allows for your character to always be in view as you move the character around in your world. You will need to play around with the camera position around your character until you are satisfied with the results.
Sprite
The Sprite node is the image or sprite sheet of your character. A sprite sheet is an image that consists of several smaller images. Combining the small images in one big image improves the game performance, reduces the memory usage and speeds up the start-up time of the game. You can then specify how many horizontal sprites are in the image, and how many vertical sprites are in the images. These are then split up into frames which can be used to cycle through these images and create the effect of the character walking or firing a gun etc.
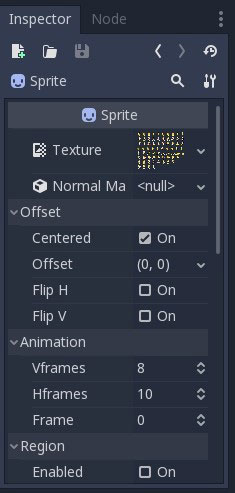
Once you click on your Sprite node you will see a few options underneath your scene. These will display under the ‘Inspector’ tab. Here you will see a Texture option where you can drag and drop your image (sprite) or sprite sheet. Under the ‘Animation’ section you will see the options’ Vframes’, ‘Hframes’ and Frame. ‘Vframes’ is used to specify how many vertical images can be contained in your sprite sheet whereas ‘Hframes’ is to specify the number of horizontal images. The ‘Frame’ option can be cycled to see all images inside the sprite sheet and identify which images are assigned to which frame number.
Area2D
The Area2D object has a CollisionShape2D node as a child node. This serves as an area around your character where you would want to handle some type of event or check some type of collision. For example, if you walk into an enemy and collide, the CollisionShape2D object of the KinematicBody2D will prevent you from walking through the enemy but what would make you decide if you need to respawn or not? This is where the Area2D comes in. You can check all objects within the Area2D and trigger some function or method to handle the event needed.
Next to the KinematicBody2D node you will see 3 icons.

The first icon indicates that the node has a group attached to it. This is useful to classify certain object into a specific group. When creating enemies, you would want to put them all in the same group. Reason for this is that when an object enters your Area2D, and you identify it as belonging to the enemy group, you can trigger the right action or event.
The second icon indicates that the KinematicBody2D has a script attached to it. This means that the node is controlled by this script. It does not necessarily mean the object can move when a script is attached to it. It could have some code that just makes the object do something or perform some type of event and/or action.
The last icon, which all nodes will have, will hide and show the node in the 2D view of your editor.
Views
If you open Godot you will see 4 view options in the middle on the top of your screen. These options are 2D, 3D, Script and AssetLib. The one highlighted in blue is your current selected view. For our 2D game, we will only be using the 2d view and the Script view.

Looking at our game character
Making the character move and do things such as sliding or shooting can sometimes be a bit tricky. You will need to create this movement or action using the script view and writing some code for it. Currently, 400 lines of code make our character awesome and can still grow when adding more features to the character.
The first thing you will notice about the Script attached to our character node is that right at the top we can see that this script extends KinematicBody2D. This gives us some build in methods, variables and features specific to the KinematicBody2D type which we can then use to make the development or scripting process even easier.
Numerous activities in Godot are started by call-backs or simulated methods, so there is no need to write code that runs all the time. Although, it is still common to need a script to be handled on every frame.
Types of processing
There are two types of processing:
- Idle processing
- Physics processing.
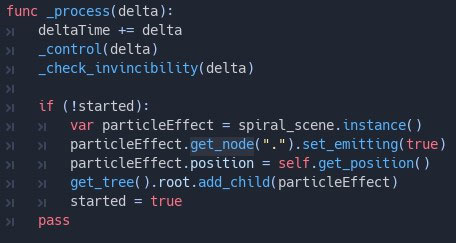
Idle processing is activated when the method _process() is found in a script. It can be turned off and on with the _set_process(true) method. This method will be called every time a frame is drawn, so it’s fully dependent on how many frames per second (FPS) the application is running at. The delta parameter contains the time elapsed in seconds, as a floating point, since the previous call to _process(). This is useful for doing some calculations regarding movement speed and gravity setups which we will look into shortly. See the screenshot below.
Physics processing with _physics_process() is similar, but it should be used for processes that must happen before each physics step, such as controlling a character. It always runs before a physics step and it is called at fixed time intervals – 60 times per second by default but can be configured. The method _process(), however, is not synced with physics. Its frame rate is not constant and is dependent on hardware and game optimization. Its execution is done after the physics step on single-threaded games.
Though, we won’t be using the _physics_process() method for controlling our character, as our 2D game is quite simple and does not require much physics handling. Now let’s look at controlling our character with code.
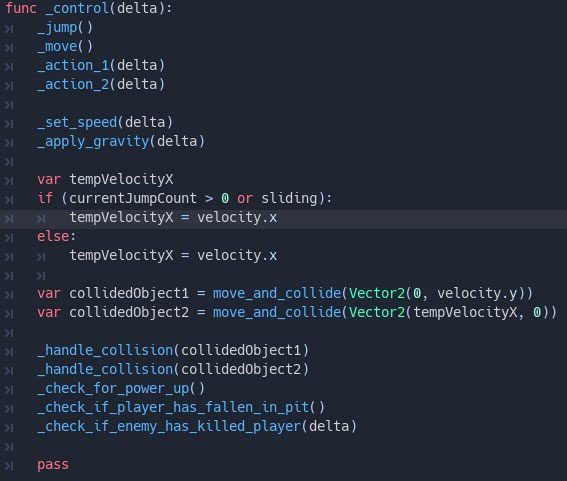
The image above shows the _control() method which we pass delta into once again. This is not a build in method of Godot like the _set_process() method. You will need to create the method yourself. Inside our _control() method you will see a few other method calls such as _jump(), _move(), _set_speed() etc. These are all methods we will need to create to control our character. We will have a look at some of these methods after this.
Movement and collision
The move_and_collide() method is again a built-in function of Godot. This method takes one parameter which is a Vector2 indicating the body’s relative movement. Typically, this is your velocity vector multiplied by the frame timestep (delta). If the engine detects a collision anywhere along this vector, the body will immediately stop moving. If this happens, the method will return a KinematicCollision2D object. Vector2 is a 2-element structure that can be used to represent positions in 2d-space, or any other pair of numeric values. Whereas the first parameter of the Vector 2 is the x position and the second parameter the y position. The reason why you are seeing two of these method calls in the screenshot above is that we want our character to collide with something on the x-axis such as crates and enemies and we want our character to collide with things on the y-axis such as the floor. Our character will fall through the floor if we don’t use the move_and_collide() method. The reason we aren’t passing both parameters in on one method call is that this will make the character move very slowly, while constantly colliding with all object it touches. Even jumping up against a wall and touching the side of the wall will make the character move slowly down the wall as if it is sticking to the wall, and we don’t want this to happen.
Instead of using move_and_collide() to move the character you can use the move_and_slide() method call. The move_and_slide() method call automatically calculates frame-based movement using delta. Do not multiply your velocity vector by delta before passing it to move_and_slide(). The reason I did not use this method over move_and_collide() is because of the return type of these two functions. The move_and_collide() method call will return a KinematicCollision2D object which is useful to detect if you walked into other player objects. You will see me passing the object returned to another method called _handle_collision(), which I use to detect what should happen when my character is colliding with this type of object. Although this will not work on all object types. If you collide with something that does not have a KinematicCollision2D object type you will need some other way of identifying the object you walked into. This is where the Area2D node is useful. You can read up on these movement functions on the official documentation here: http://docs.godotengine.org/en/3.0/tutorials/physics/using_kinematic_body_2d.html.
Area2D
This is a 2D area used for detection and 2D physics influence.
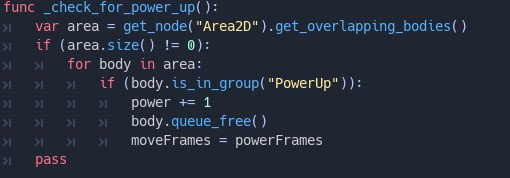
The above screenshot shows how I used the Area2D object to determine if my character has picked up a power-up. The get_overlapping_bodies() method call returns a list of crossing PhysicsBody2Ds, which we can then use to look through all objects in the Area2D and decide how we would like to handle them. In this case, if the object is a power-up then we will increase the character's power by one and destroy the power-up with the queue_free() method. The safest way to delete a node is by using the queue_free() method. This erases the node safely during idle. This will release the resources hogged by the power-up object as well. When a node is freed, it also frees all its children nodes. Because of this, manually deleting nodes is much simpler than it seems. Free the base node, and everything else in the subtree goes away with it. Be careful to create many game objects and move them out of the screen but not freeing the resources they have used. This can dramatically affect your game performance.
Applying gravity to your character
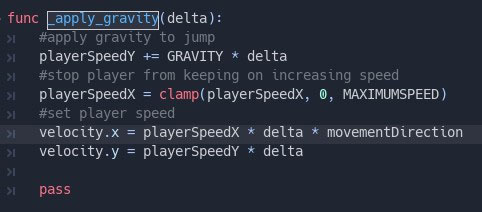
Remember: RigidBody2D types have gravity applied to the automatically which you can configure in the Editor. However, our KinematicBody2D character does not have gravity applied to him automatically. Thus, we need to create the gravity effect ourselves. If you have a look at the screenshot below, this is how I replicated the gravity effect on my character:
const GRAVITY = 800
const MAXIMUMSPEED = 400
First, we will need a few constants. We will define a constant with the name GRAVITY at the top of the script and assign it a value of 800. We will also require a max speed variable for our player. We can create another constant called MAXIMUMSPEED and assign it a value of 400. We will then set our playerSpeedY equal to itself + our GRAVITY constant times the delta variable (playerSpeedY += GRAVITY * delta). This will apply our gravity for each delta time section of our framerates (The delta parameter contains the time elapsed in seconds, as a floating point, since the previous call to _process()). This will make our character come down gradually after we jumped until we touch the ground again. Even when we are standing on the ground the gravity is still being applied to our character.
The clamp function call in the screenshot above is used to lock the value of something. I have done this on the playerSpeedX variable and I have used the MAXIMUMSPEED constant variable as the measure I would like to clamp it by. This means my characters speed will gradually increase as I hold down my arrow buttons to move left and right, but it won’t move faster than my max speed I have specified. This is useful for controlling and limiting certain values.]
Since I have decided to use move_and_collide() to move my character I would need to multiply my movement speed with delta and my movement direction which will be either 1 or -1 to determine whether my character is moving left or right. Whereas move_and_slide() would automatically multiply the velocity by delta and we would not need to do so ourselves.
Animating our character
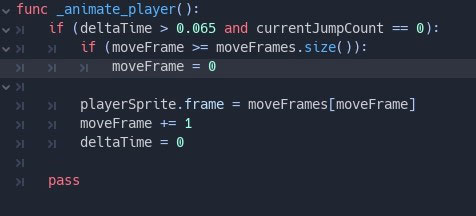
To make our character have different movements we use a sprite sheet to allow for cycling of multiple images as mentioned earlier. Firstly, we need to know when to animate our player. The above screenshot shows my characters movement frames. This will make the character look like it is running in the direction you are pressing. We want to check that it is only changing sprite images every 0.065 seconds of our current delta time which we calculate in our process() function by saying deltaTime += delta.
We will need to know which frames in our sprite sheet we will need to use for animating our character. In this case the move frames are [60, 61, 62, 63, 64, 65, 66, 67]. This is then assigned to a variable called moveFrames. You will see an if statement where I check that the current moveFrame is not greater than the amount of move frames we have, and if it is I will reset our current move frame back to the first move frame which is 0 (Remember arrays start at 0 and not 1).
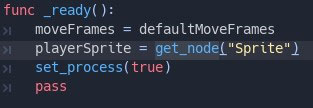
We then set our player sprite frame to the current frame and increment the current frame by one. We set the player sprite variable in the _ready() method by saying playerSprite = get_node("Sprite"). We then reset deltaTime to 0 at the end of our animation phase to allow for checking the next animation frame. Now when we hold down our movement buttons, our character will be cycling through all of the movement frames and restart these frames once cycled through all of them. This makes it look like our character is actually running in the direction we are pressing.
Input Mapping
Input mapping can be found under Project -> Project Settings -> Input Map. Here you will find a bunch of input mapping already done for you, you can also add some more of your own. You can also set up multiple keys under one mapping description.
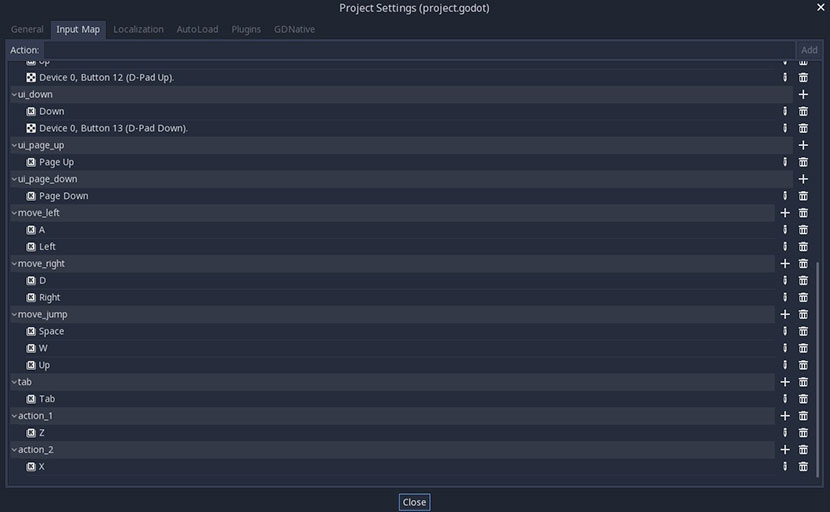
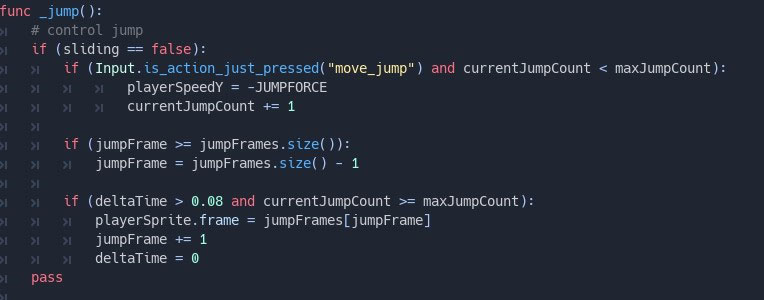
What does this mean?
Looking at our _jump() method we check Input.is_action_just_pressed(“move_jump”). This is a build in function that Godot offers us for checking if a button is pressed. On the Input Map screenshot above, where we define our key mappings, we would then need to define a new mapping called move_jump and assign a key to this mapping. I have assigned ‘space’, ‘up arrow’ and ‘w’ for my jumping action. This way players can choose their preference and play the game with whichever they are more comfortable with.
Instancing
What is instancing in Godot and where do we use it?
Instancing allows you to create one scene in Godot and then reuse that scene multiple times on different places.

Take a look at the above line of code. Here we preload a scene into our character script. This is the bullet scene we use to create a bullet when our character fires his weapon. We preload the scene because we don’t use it yet at this point. We know that we will be using it in this script and that is why we preload a reference to the scene.

This is how we actually create an instance from the scene we preloaded. After we pre-loaded a scene and created an instance of the scene, we can then work with the scene by referencing the bullet variable we have assigned the bullet_scene instance to. This can be done multiple times and saves us the effort of redoing all the code for the bullet scene every time we want to fire a bullet. It is best practice to save all your objects as scenes so that you can create instances of your objects and use them throughout the entire game without redoing the code for your object.
After creating an instance of an object, it does not add the object to your current scene or game view. You would still need to add the instance of the scene to your current view. This can be done with the below code.

Once this code has been triggered the bullet scene appears in front of your character. This is useful for altering the scene before actually adding it to the view. Before we add the bullet scene to our current game view, we set some values such as the position of the bullet and the moving direction of the bullet. Only after we have set these values we add the bullet scene into our game. If we did not do this, the bullet would not appear in front of our character and move into the direction our character is facing. It would start at the beginning of our level and always move into the same initial direction.
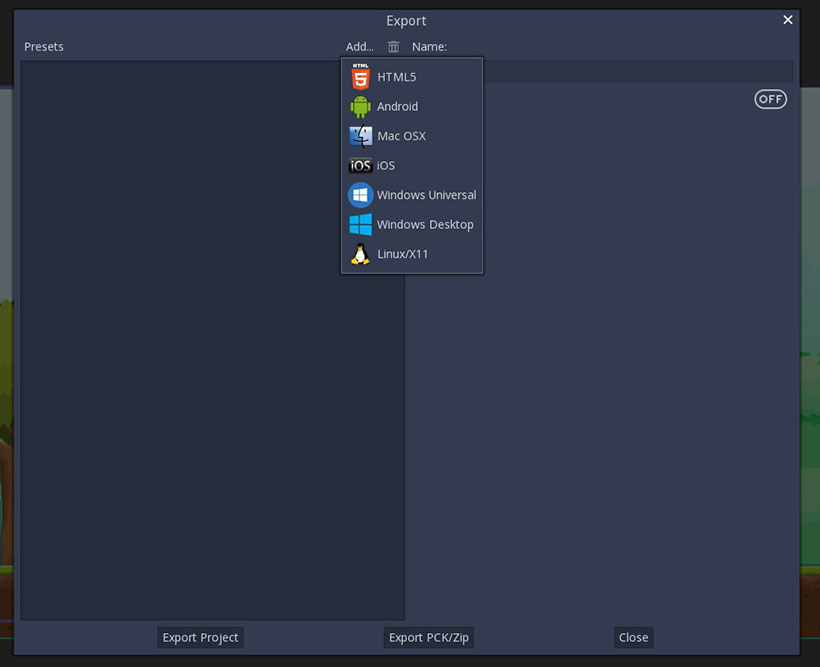
Exporting your game for your platform
To export your game, you will need to click on the Export option under Project.
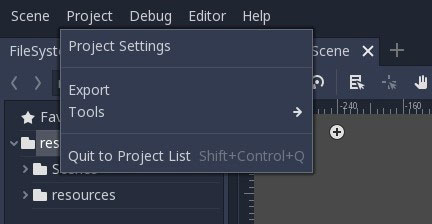
Once you clicked on the Export option, you will find a new window opening up. At the top of the window, you will see an Add button. If selected, Godot will display all available platforms to you. Looking at the image below we can see a list of all the popular platforms.
The end
Godot makes game creation easy and fun. If you have ever wanted to try game development I would really recommend Godot 3 as your first option. Not only is Godot open source and free it also offers a large number of sample games and demos to get you started. By looking at some of the game projects offered by Godot you can get up to speed with game creation in no time.
We have not touched on all concepts of Godot, neither all the objects and code in the sample game I have provided you. But the ones we have touched on are some of the more important ones to get you started. I hope this article was useful to you and that it will intrigue you into trying game development with Godot.
You can have a look on the official Godot YouTube channel to see what some people have been working on lately and what true potential Godot has. https://www.youtube.com/c/GodotEngineOfficial.
I do not take any credit for the images used in my sample game
The images found in my sample game, I have downloaded at:
https://www.gameart2d.com/freebies.html
For the game assets in Freebies section, it's under Creative Common Zero (CC0) a.k.a Public Domain license.
You can also create your own sprite character sheets here:
http://gaurav.munjal.us/Universal-LPC-Spritesheet-Character-Generator/
All art is dual licensed: GPL3 and CC-BY-SA3