
There are many courses and workshops available today if you're looking to learn more about the theory of implementing Agile. Google the words 'Agile training' and you'll find reams of options for training courses and training providers. The challenge is knowing which courses to choose and why. We have done the hard work for you by selecting the top 7 Agile training courses you should consider in 2019 and beyond.
Where possible, and if your budget allows, consider an Agile course that is internationally certified. Not only will it benefit your individual skills but it will add to your career growth and resume. These seven courses come highly recommended in order to understand the benefits an Agile methodology can bring to an organisation:
1. ICAgile Certified Professional in Agile Fundamentals (ICP)
This course is a very good start for your Agile journey. It covers the history of Agile, the Agile Manifesto, the Agile principles, and a good introduction to some widely applied frameworks (such as Scrum, Kanban and SAFe) and practices. ICAgile fundamentals learning objectives delve into key concepts such as adaptive planning, value-driven development, team collaboration and frequent feedback for continuous improvement. It also focuses on what it means to be Agile and achieve organisational agility.
The ICP credential has the broadest target audience (even outside of IT) since it is appropriate for those new to Agile, and for practitioners who recognise the need to focus on “being” agile in addition to “doing” agile. An ICP certification is internationally recognised.
2. Scrum Alliance - Certified Scrum Master (CSM)
The Certified Scrum Master’s course provides everything you need to get started with Scrum, today’s most widely used agile project management methodology. If you have the knowledge and experience developing or managing software delivery projects or teams, but do not have expertise in Agile yet, this course is for you. The course is an introduction to Scrum and will foster a shared understanding of the topic. It is suited for all roles within the IT environment and very popular amongst Scrum Masters and Project Managers. (A non-certified, more affordable version of Scrum training is also available for those budget sensitive organisations or individuals.)
3. Scrum Alliance - Certified Scrum Product Owner (CSPO)
The CSPO training course uses Scrum to teach Product Ownership (Product Management in Agile) and provides a stimulating, experiential learning experience through the use of gameplay, hands-on practical exercises, real-life case studies and in-depth discussions of the various parts of the Scrum framework and how the parts fit together.
On completing the course, delegates are designated as a Certified Scrum Product Owner by the Scrum Alliance. As noted by accredited Certified Scrum Trainer, Iain McKenna and DVT Academy trainer, “A good Product Owner drives delivery of value to customers and users and therefore plays a critical role in a Scrum team.”
4. ICAgile Certified Professional in Agile Business Analysis (ICP-BVA)
The ICP-BVA's learning objectives focus on the need for value management, role scope and diversity. These include: How to change your thinking skills, value management behaviours, determine value in the initiative, communicate that value, analyse to determine value, explore the solution, manage artifacts and enable valuable delivery.
Deidre Forbay, trainer & senior business analyst at DVT says, "Business value analysis is a crucial aspect of any Agile project. Learn how to ensure that your Agile project delivers business value to your clients and how to facilitate value-driven workshops with this course."
5. Agile for Executives
If you are a CEO, Manager or in a role to drive value within the organisation, then this course is for you. This workshop offers clear, insightful guidance into the philosophies of Agile, yet also provides an opportunity to understand the frameworks, secrets on how to support and structure teams within the solution design and delivery spaces. The Agile for Executives workshop will challenge you to think differently while explaining the technicalities around Agile on a higher level. It focuses on the requirements from a leadership perspective, key roles to set you up for success as well as roadmap and budgeting guidelines.
6. Scaled Agile Framework (SAFe)
This two-day course teaches the Lean-Agile principles and practices of the Scaled Agile Framework (SAFe). You’ll learn how to execute and release value through Agile Release Trains, how to build an Agile Portfolio, and how to lead a Lean-Agile transformation at enterprise scale. You will also gain an understanding of the Lean-Agile mindset and how to apply the principles and practices of SAFe to support Agile teams, programs, program portfolio management, and to coordinate large Value Streams. Attending the class prepares you to take the exam and become a certified SAFe Agilist (SA).
7. Team Strengths
Agile is all about people and how to best work together to achieve a goal. The individual CliftonStrengths course (developed by Gallup), is one of the most unique and reliable ways in which you can develop teams in fostering a self-organising culture.
This enriching course will take team collaboration to the next level. It is recommended for anybody who is looking for the next level in individual and team development. It is also recommended for new as well as advanced Agile teams.
Develop a skill set that’s in demand worldwide—and empower your enterprises to succeed in a disruptive marketplace. By attending all or some of these courses and by gaining international certifications you will be able to shape your Agile career and benefit from the time invested in your future.
For more information visit https://www.dvt.co.za/training.

Can you teach an old dog new tricks? Yes you can!
This is Caesar, our Beagle. He’s 4 years old and he loves food. Any food!
I can teach him any trick if there’s food involved. He’ll make a great 3rd slip if the cricket ball was a cookie.

Old dog. New tricks.
Your 4 year old application can also learn new tricks. That cute puppy code-base that evolved into today’s resource hungry monolith can be modernised for the cloud.
In Greek, monos (single) + lithos (stone) literally means a single piece of stone.

The typical monolith application
I feel your pain. I’ve worked on many projects where customers explained to us how their “single piece of stone” application became so heavy that it often fell over when surpassing a certain number of users. Part of the solution is always to improve the quality of the code and the other part is application hosting at scale.
The cloud is great for running applications at scale. As an ASP.NET developer my preferred choice is always Azure App Services. It’s developer friendly. I can forget about Docker, Kubernetes, Yaml files and all things infrastructure while rather being customer-focussed so that I can deliver real features on time and on budget.
What a relief! Now I can focus on my application and leave the uptime to those who excel in enterprise-grade, secure, performant and compliant application hosting.
Scaling is important. As your business grows, your application will need to handle more traffic.
With monoliths, the only option is vertical scaling: Adding more RAM, disk space or CPUs. But there’s always a hard limit to scaling up your application.
With a few small changes you can modernise your application for hosting in the cloud. Azure App Services allows for horizontal scaling. It can scale out your application from 1 to any number of instances.

Scaling out your application to 3 instances on an Azure App Service
But there are a few things to keep in mind when preparing to host at scale.
Application State
If your application carries any form of state such as session data, in-memory caching and flat-file storage, it’s not quite ready for vertical scaling.
There should be a clear separation between processing and storage. Your application should contain user interfaces, API’s, business logic and data access methods, but storage should reside elsewhere.
Session data and caching ideally belong in a Redis backplane, while application data should be stored in a cloud database.
Data Storage
Select the cloud database engine closest to your current on-premise one.
Azure offers many data storage options such as SQL Server, MySQL, PostgreSQL and CosmosDB. CosmosDB has a Mongo API if you prefer a NoSQL database.
The databases are built for scale and you have a myriad of choices in terms of disk size, RAM and CPU’s. Many replication options are available as well.
Geography
When setting up your Azure App Service and database, make sure they’re in the same region. Your application should live as close as possible to the data.
If you’re in South Africa, be sure to make use of the newly added Cape Town or Johannesburg regions. Azure calls them South Africa West and South Africa North respectively.
Consumption
While scale is convenient, it’s important to keep an eye on the consumption as well. Azure offers a cost calculator to help with estimates up front, but the dashboard in the Azure Portal also shows your real-time consumption.
The benefits of Azure App Services are many. For me the following stand out.
- Almost any application can be hosted in Azure App Services
- Best practices are built in: performance, reliability, security, compliance
- Horizontal scaling allows for growth and peak periods
- Zero-downtime deployments ensure that customers are not interrupted
- The staging environment helps you test before going live
- Builds and deployments from any Git repository allows for reliable, repeatable rollouts
Whether your code is written in Python, Ruby, PHP, Java, .NET Framework or .NET Core, Azure App Services can host it for you.
As a Microsoft Gold Partner, DVT helps businesses like yours to scale for the future. Let’s set up a meeting and discuss your cloud requirements.
Now what happened to my cookie?

HR plays a vital role in software development production by ensuring a high-performing team and providing support for employee growth.


In this tutorial we will take a look at Android’s Navigation architecture component. The purpose of this component is to simplify the implementation of navigation in our android apps. The navigation component forms part of a larger group of libraries called Jetpack.
Among other benefits such as Automatic handling of fragment transactions, Correctly handling up and back action by default, Default behaviours for animations and transitions and Type safety when passing information while navigating, this component also gives us the ability to visualise our navigation graph and see an overview of the flow of our app.
Let’s get started!
We will be building an app called CountryFact which stores statistical information of different countries in Africa. Download the starter project from my github using the below link:
Run the project. You will see a list of countries loaded from the CountryInfoProvider. When you click on a country you will be navigated to the detail screen containing all the information relating to the selected country. Play around with the app and loop through the starter code to familiarise yourself.
Add Gradle dependencies
To use the Navigation component we need to add some dependencies. You can get the latest dependency here. At the time of writing this article the below was latest so go ahead and add it to your Build.gradle as follows:
// Navigation Components

def navigationVersion = "1.0.0-rc02"
implementation "android.arch.navigation:navigation-fragment-ktx:$navigationVersion"
implementation "android.arch.navigation:navigation-ui-ktx:$navigationVersion"
implementation 'android.arch.navigation:navigation-fragment:1.0.0'
Next we will create a navigation graph for our application. The navigation graph is used to define all the possible paths a user can take to navigate through your application. It enables us to visually see our app’s entire journey from a given destination to the next.
Right click on the res directory and select New ▸ Android Resource File. In the New Resource File dialog, input countryfact_navigation_graph as the File name: and select Navigation in the Resource type: drop-down list. Click OK to create your graph.

Add a main entry point
Google advocates that we take the single activity, multi fragment approach when building applications. We will now set the activity_main.xml layout as our main entry point into our application. Open the activity_main.xml layout and update it as below:
<?xml version="1.0" encoding="utf-8"?>

<android.support.constraint.ConstraintLayout

        xmlns:android="http://schemas.android.com/apk/res/android"
        xmlns:app="http://schemas.android.com/apk/res-auto"
        xmlns:tools="http://schemas.android.com/tools"
        android:layout_width="match_parent"
        android:layout_height="match_parent"

        tools:context="com.myricseptember.countryfact.ui.MainActivity">
The navigationHostFragment will be the main access point for all our fragments.
Let’s take a look at some lines of code in our navigation host:
android:name="androidx.navigation.fragment.NavHostFragment"
The above is a widget you add to your layout which is used to display different destinations from your Navigation Graph.
app:navGraph="@navigation/countryfact_navigation_graph" />
The above line is used to specify our navigation graph. Remember our navigation graph can be used to find all possible paths a user can take to navigate through your application and all defined destinations.
Next you will modify MainActivity to make use of the Navigation Component to handle navigation in the app for us.
Update MainActivity
Replace all the code in your MainActivity with the below chunk of code:
private lateinit var navigationController: NavController

override fun onCreate(savedInstanceState: Bundle?) {
    super.onCreate(savedInstanceState)
    setContentView(R.layout.activity_main)

    navigationController = findNavController(R.id.navigationHostFragment)
    NavigationUI.setupActionBarWithNavController(this, navigationController)

}

override fun onSupportNavigateUp() = navigationController.navigateUp()
What are we doing here?
private lateinit var navigationController: NavController
In the above piece of code we are declaring an instance of our NavController specifically for this activity.
navigationController = findNavController(R.id.navigationHostFragment)
We then initialise our NavController using the findNavController() method and attach it to the navigationHostFragment that we created earlier in our layout.
NavigationUI.setupActionBarWithNavController(this, navigationController)
Next, to enable the ActionBar to show a back button whenever a child fragment is attached to this Activity. We tie the navigationController to the ActionBar for this activity using the NavigationUI helper class.
override fun onSupportNavigateUp() = navigationController.navigateUp()
Finally, the above line of code is used to correctly handle up and back action by default .
When our application launches we need to tell our application what the default destination is. This means that we need to specify what must be the first screen to be displayed to the user when the application is first launched. Let’s see how we can achieve that.
Default destination
Open the countryfact_navigation_graph.xml.

The red rectangles show two places you can click to specify your default destination. A dialog will open from which you can either search the fragment that you want to set as the default destination or you can manually scroll down the given list.
Select CountryListFragment as your default destination.
Once you’ve selected CountryListFragment you will notice that it basically shows blank with some grey text indicating that the preview is unavailable. Let’s fix that so you can see the actual preview.
Click on the “Text” tab to open the XML and replace the countryListFragment with the below piece of code:
<fragment android:id="@+id/countryListFragment"
          android:name="com.myricseptember.countryfact.ui.list.CountryListFragment"
          android:label="CountryListFragment"
          tools:layout="@layout/fragment_country_list"/>
The only difference is that you added the below line of code in order for the preview to show. This specifies which layout to show for that particular destination.
tools:layout="@layout/fragment_country_list"
Cool! You’ve set your default destination.
Now that we have our default destination we want to navigate to the fragment that will show us the details relating to a particular country when selected by the user.
Navigate to next fragment
Click on the new destination button on the top left and select fragment_country_details from the dropdown. The CountryDetailsFragment fragment is now added as one of your destinations and will be the destination we will navigate to from our default destination.
When you select the CountryListFragment you will see a circle appear on the side. Drag the circle to the CountryDetailsFragment destination. Once done you will see an arrow connecting the two destinations.

Note: Just as with the countryListFragment destination remember to also add the below line in the countryDetailsFragment destination XML to see how the destination will look like.
tools:layout="@layout/fragment_country_details"
Next, open the CountryListFragment and replace all the code in the onItemClick() method with the below code:
view?.findNavController()?.navigate(
    R.id.action_countryListFragment_to_countryDetailsFragment2)
Instead of using an intent for navigation we are now using the NavController to perform the navigation. You will notice we’re using an id that wasn’t created by you. The id action_countryListFragment_to_countryDetailsFragment2 was auto generated by Android studio when you connected the countryListFragment and the countryDetailsFragment destinations. With our new changes in place we no longer need the CountryDetailsActivity and the activity_country_details layout from the project so delete that.
Note: When the “Usages Detected” dialog pops up just click on Delete Anyway since its detecting usages that we will also delete.
Also remove the below from the manifest:
<activity
        android:name=".ui.details.CountryDetailsActivity"
        android:label="@string/country_details"
        android:parentActivityName=".ui.MainActivity" />
Run the app and see the navigation component in action.
But wait! The information related to the specific country isn’t showing anymore? This is because we removed the functionality for the app to pass data between screens. We will fix this next by adding functionality for passing the data to the next screen.
Passing data to between Fragments
We will now be passing the country data based on the country that is selected from the list. Open the CountryListFragment fragment and replace the code in the onItemClick() method with the below:
val countryFactBundle = Bundle().apply {
    putInt(getString(R.string.country_id), country.id)
}

view?.findNavController()?.navigate(
R.id.action_countryListFragment_to_countryDetailsFragment2,countryFactBundle)
Here, we create a bundle to store the id of the selected country which we will use to display the data based on the id in the next fragment. We then use our NavController again but this time with an additional parameter to pass the bundle.
Now, open the CountryDetailsFragment and replace :
val countryId = activity?.intent?.getIntExtra(getString(R.string.country_id),0)
with:
val countryId = arguments?.getInt(getString(R.string.country_id))
Run the app again to see if the selected country information is displaying.
The country information should now be displaying properly. But you’ll notice that the title is showing the fragment name which is definitely not what we want to show the user.
Fix the title
The title is auto-generated every time we add the fragment as a destination within countryfact_navigation_graph.xml. We can easily fix this by changing the title from within our navigation graph.
Open countryfact_navigation_graph.xml and select the Design tab if you aren’t already there. Select the CountryListFragment and change the Label on the right hand side to Country Fact. Next, we want the name of the selected country to be displayed as the title .Open the CountryDetailsFragment and add the bellow lines of code in populateCountryDetails() method:
(activity as AppCompatActivity).supportActionBar?.title = country?.name
Run the app again. You will now see that the title display correctly.
Great! Our app is now doing what we want it to do. But we can make it just a little better by animating the transition between screens. So let’s do that now.
Animate transitions between destinations
We are provided with the following animations to choose from:
- Entering a destination
- Exiting a destination
- Entering a destination via a pop action
- Exiting a destination via a pop action
Note: If you want to read more about the pop action follow this link.
To add some animations to actions do the following:
1. In the Navigation editor, click on the action(arrow) where the animation should occur.
2. On the right side in the Animations section of the Attributes panel, click the dropdown arrow next to the animation you’d like to add and choose from the animation options as discussed above.

Now run the app again. We now have some nice animation when navigating between the different screens.
Conclusion
Awesome! We created a simple app using the Navigation Architecture Component. There is still much more you can learn about when using the Navigation Architecture Components such as:
- Menu navigation, bottom navigation, and menu drawer navigation
- Deep links etc.
I look forward to your feedback and if, for some reason, you got stuck I would advise you to take a look at the repo containing the completed project.
Thank you for reading this article. Follow me on Twitter and on Medium for future articles.
This article was first published on Medium on 27 May 2019.

Agile leadership allows the discomfort of being vulnerable and transparent, earning the respect of followers by not leading from a distance.

This article aims to document a solution for String Encryption for iOS and macOS binaries. There are a few issues that arise and these are covered and mitigated as required. Two types of binary analysis are normally employed by hackers and reverse engineers, namely, static and dynamic analysis. String encryption falls under static analysis protection because it makes it challenging for attackers to inspect the application's sensitive string content such as backend services keys at rest.
Although the encryption scheme is arbitrary it would be beneficial to use a block cipher such as RC6, 3DES, AES, etc. This type of cipher is employed because it provides a one-to-one mapping with respect to byte buffer size whilst simultaneously satisfying the encryption requirement. This has an additional benefit in that it allows the application binary to maintain its current size after encrypting the strings at rest, it is also easier to map in and out of memory without the need to reallocate memory buffers of differing sizes.
This article won't delve into too much detail regarding the Mach-O binary file format — It is the native file format that contains, amongst other things, the application data and code to be executed on any Apple device (iPhone, iPad, MacBook, Apple Watch, etc.).

Figure 1 - The Mach-O Binary Sections
The important knowledge that is required for understanding the string encryption implementation in relation to the Mach-O binary is described below.
As indicated in Figure 1 the Mach-O binary is comprised of five distinct sections, namely, Header, Load Commands, __TEXT, __DATA, and __LINKEDIT sections. The section that is interesting for a first draft of the string encryption is the __TEXT section. Each section has a variable number of segments, the segment that contains the strings to be encrypted is found inside of the __TEXT section and is referred to as the __cstring segment. The __cstring segment contains all of the strings that are included in the application source code at the C, Objective-C and Swift level except for CFStrings which are stored inside of the __DATA section. It should be noted that the __cstring segment includes any strings inside of third party frameworks, static libraries or CocoaPods. This structure is visualised in Figure 2.
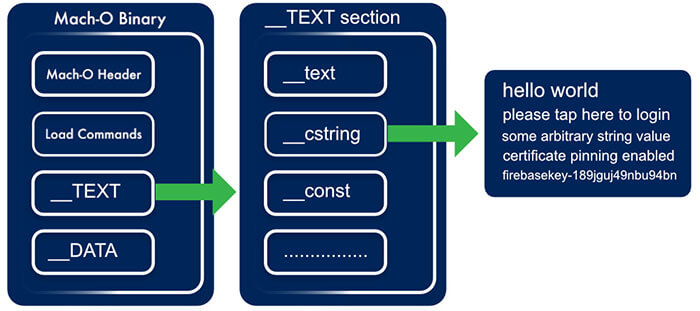
Figure 2 - The Mach-O Binary __cstring Segment
This concludes the overview and the description of each of the components and their purpose in facilitating String Encryption. What follows is two algorithms for String Encryption. The algorithms are comprised of two distinct phases, build and runtime. A source code implementation is provided for the second algorithm, as it is, in my opinion, superior, but the first is discussed and described.
Algorithm Overview, Mach-O String Encryption Variant #1
Build Time Overview
- Generate Mach-O segment to store the encryption key
- Encrypt Mach-O _cstring segment after the Mach-O binary is generated (using a simple post-build ruby script)
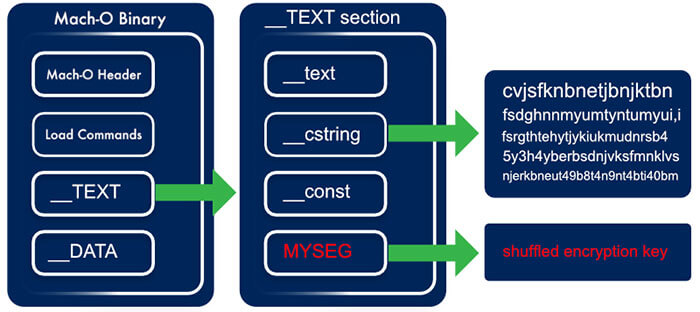
Figure 3 - The Mach-O Binary with new Segments and encrypted __cstring segment
Runtime Overview
- Obtain the __cstring segment memory block
- Obtain the __MYSEG encryption key segment memory block
- Update the memory blocks protection level (read/write)
- Encrypt the memory block using a block cipher encryption algorithm (e.g. AES)
- Update the memory blocks protection level (read-only, default)
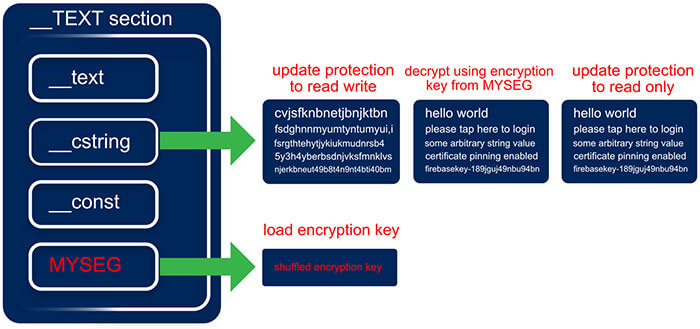
Figure 4 - The Mach-O Binary runtime decryption process
This solution works perfectly for simple projects but it does have a few caveats. Among others, we don't have real control over what's embedded in the __cstring segment. This has implications when other 3rd party libraries are trying to access this segment before it is decrypted at runtime. This is precisely the case when including 3rd party CocoaPods such as Firebase. Firebase is expecting certain strings to be available before the main application executes. One could try to ensure that the string decryption algorithm executes before the Firebase framework requires the strings but as one can imagine this could quickly become a tedious process especially if a number of frameworks or libraries are trying to access data from the __cstring segment. It also appears that when this segment is encrypted (leaving only the swift class names) Apple parses the binary and rejects it when it is submitted for AppStore review — though this is a problem for commercial applications this solution is still applicable in an enterprise application context so it is not completely useless.
What if string encryption is required for commercial applications? As noted above it is possible to create new Mach-O binary segments that can be queried at runtime. This is exactly what the second — and more flexible — algorithm does. This also has a cost that is incurred with respect to development time because a string loader will need to be implemented for both the c and Swift layer. The second algorithm is described below:
Algorithm Overview, Mach-O String Encryption Variant #2
Build Time Overview
- Generate Mach-O segment to store the encryption key
- Generate Mach-O segment to store the c layer strings
- Generate Mach-O segment to store the Swift layer strings
- Inject the encryption key into the keys segment
- Inject the encrypted strings into the c layer segment
- Inject the encrypted strings into the Swift segment

Figure 5 - The Mach-O __TEXT Section Layout With Custom Segments
Runtime Overview
- Obtain the encryption key from the keys segment memory block
- Obtain the c layer strings segment memory block
- Obtain the Swift layer strings segment memory block
- Update each of the memory blocks protection levels (read/write)
- Decrypt each of the memory blocks using a block cipher encryption algorithm (in the sample project provided its AES) using the key provided in the key section
- Update each of the memory blocks protection level (read-only, default)
- Load c strings into the c_string_store hash table class in c
- Load swift strings into the SecureStringStore class in Swift
Build Time Implementation
The first step would be to generate the raw strings JSON files, swift.json and c.txt. These JSON files need to follow a simple format and we will avoid any complex structures for the time being. A sample is shown below:
[ JSON]
{
	"some-application-secret":"my_super_secret_code",
	"album_leak_download_url":"https://leaks.com/unreleased/super_secret_album.zip",
	...
	...
	...
}
[ JSON]
These plaintext strings files need to be encrypted before they can be included inside of the binary. A simple key_obfuscator.rb is provided that transforms the keys for the Swift and C strings file into obfuscated strings as well as generating the StringsTable.swift and CStringTable.h. The cryptonology (this is an inside joke on the team I work on) tool accepts both the plaintext c.txt and swift.json files as input and produces the encrypted strings files as well as the key.txt file.
All the prerequisites are now complete for integrating the encrypted strings into the binary as custom Mach-O segments as depicted in Figure 5. A segment can be created inside of a section by adding an 'Other Linker Flags' command inside of the build settings of the main executable binary in Xcode. The sections are created inside of the __TEXT section to make them appear a bit more inconspicuous and they also get the standard __TEXT section protections applied to them at load time as an added bonus. The sections are created by adding the following to the 'Other Linker Flags' build setting.
[ CODE ]
-Wl,-sectcreate,__TEXT,__MS_SAUCE,StringsDemo/encrypted-strings/key.txt
-Wl,-sectcreate,__TEXT,__MS_SWIFT,StringsDemo/encrypted-strings/swift.json
-Wl,-sectcreate,__TEXT,__MS_C,StringsDemo/encrypted-strings/c.txt
[ CODE ]
It should be obvious what these commands do. They embed the contents of the encrypted files and key file generated by the cryptonology tool inside of the Mach-O binary.
The key_obfuscator.rb described above generates the StringTable.swift and CStringTable.h files. The StringTable.swift file contains a helpful enumeration with the obfuscated keys. The enumeration is used to provide a pleasant development experience to access the strings via the SecureStringStore.swift class but has the added benefit that none of these labels are leaked. When constructing the final application binary the enumeration case labels are not stored so we obtain pure obfuscated keys as a bonus. The CSecureStringStore.c is a simple hash table implementation that stores the strings used inside of the c layer. A simple Macro mapping header is generated, this is the CStringTable.h file. The strings are accessed using these macros. This provides end to end obfuscated secure string access at both the Swift and c layer. See Figure 6. for a sample of the obfuscated keys and the generated StringsTable.swift.
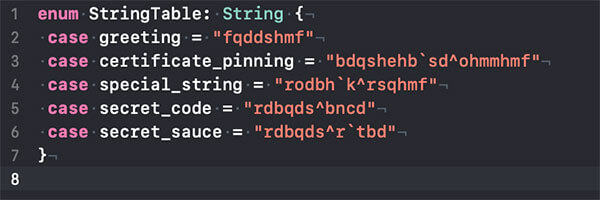
Figure 6 - [ The StringsTable.swift file - A sample]
Runtime Implementation
Three important concepts are very briefly explained in this section that are prerequisites to follow along with the runtime string loading implementation.
- Apple's DYLD (Dynamic Loader / Linker)
- Mach Memory APIs
- ASLR
Apple's DYLD
The dynamic linker is the second phase of the linking process that is invoked at runtime when loading a Mach-O application binary. It resolves load-time and run-time dependencies, and pieces together the necessary components, laying them out in memory and binding them together. DYLD also provides an API to inspect and trace its state.
Mach Memory API
The Mach Memory API provides an interface into the kernel memory to access memory regions via an abstraction layer. It is constructed atop a POSIX compliant UNIX memory API.
ASLR
ASLR (Address Space Layout Randomization) is a form of data security used to randomize data in memory to help prevent exploits from taking control of the application. It’s a slide offset value which ensures that each memory address loaded by the dynamic linker is shifted by the slide’s size. This dynamic slide value makes it challenging to carry out automated exploits.
Implementation
The c layer consists of a number of components. A lightweight c json library called jsmn (pronounced Jasmine) jsmn.h, a lightweight AES library (tinyAES), strings_core.h & strings_core.c, and c_string_store.h & c_string_store.c files.
The Swift layer contains an implementation of the SecureStringStore.swift which loads the sensitive decrypted strings via the c layer.
strings_core.h
The strings_core.h exposes a public method that loads the unencrypted strings, this method is invoked from a Swift SecureStringStore instance.
strings_core.c
The strings_core.c file can be broken down into a set of distinct algorithmic steps or phases. These are outlined as follows:
- Load DYLD Tracing & Inspection Symbols
- Obtain ASLR Slide and Mach Header Info
- Mechanism to obtain arbitrary sections and segments from the Mach-O binary
- Mechanism to query Mach Memory Protection Level
- Mechanism to alter Mach Memory Protection Level
- Mechanism to parse JSON at the c level
- Mechanism to decrypt memory at the c level
- A constructor attribute function to ensure that all of the above execute before the main application executes. This function decrypts the strings in memory once they are loaded by the dynamic linker. These unencrypted strings are then accessible via the c_string_store instance in c and SecureStringStore in Swift.
c_string_store.h
The c_string_store.h is a simple hash table implementation in c that exposes two methods; set and request. The former sets a value for a specific key and the latter returns a value for the key. The keys are generated as a Macro map to ensure that the keys are obfuscated at link time.
c_string_store.c
The CStringStore is a trivial implementation of a hash map that allows you to store up to 2048 strings. It would be trivial to extend this to reallocate the hash table when more string memory is required but this is left for future work.
SecureStringStore.swift
This class is a wrapper of a swift dictionary data structure that provides a mechanism to access the strings via the enumeration values of the generated SwiftStringTable.swift file and the ```string(for key: StringTableValue)``` method. The secure strings are loaded via the ```void fetch_string_buffer_information(uint8_t **address, uint8_t **size)``` method exposed in the strings_core.h class.
Auxiliary
C Symbol obfuscation is provided in the sample application but is beyond the scope of the article so it will not be discussed.
Future Work & Recommendations
- Localisation Support can also be added. Accessibility is becoming increasingly important in the current global landscape.
- Source code obfuscation would also be required to ensure that it would be difficult to figure out where the Swift classes that load the strings are located.
- The strings could easily be dumped at runtime because this implementation does not focus on any dynamic analysis mitigations such as memory region protections and anti-tampering.

Discover the power of Robotic Process Automation (RPA) in enhancing efficiency and productivity. Find out how RPA can boost your productivity.

Software is inherently complex. This article serves as a reminder of the importance of simplicity in the modern software development workspace.

The most effective software development teams utilise collaboration and other best practices of agile software development. Learn more here.